Télécharger la présentation
La présentation est en train de télécharger. S'il vous plaît, attendez

1
UTL du Pays Bigouden Commission prospective

2
La prochaine conférence mardi 29 mars à 15h
La salle : Salle polyvalente de Plonéour-Lanvern Le sujet : Le journalisme et son public Par Jean-Marie Charon Sociologue et journaliste.

3
Il est l’auteur d’une quinzaine de livres.
Le conférencier Sociologue spécialiste des médias, journaliste lui-même, Jean-Marie Charon a occupé de nombreuses fonctions dans la recherche, la presse écrite et télévisuelle, et au ministère de la culture. Il est l’auteur d’une quinzaine de livres. .

4
« …En préambule, il faut aborder la question du malentendu et de cette crise de confiance entre les médias et leur public. Lorsque j'étais rédacteur en chef de Médiapouvoir, la revue a mis au point le fameux baromètre portant sur la confiance des médias - cela fait 20 ans maintenant. Et depuis, chaque année, trois thématiques sont relevées : - enfin, ils émettent souvent des critiques liées à la hiérarchisation de l'information. Année après année, les résultats donnent lieu à de fortes discussions. Très souvent des reproches assez systématiques apparaissent comme par exemple récemment, "on a trop parlé de Nicolas Sarkozy" sans prendre en compte le contexte actuel et aussi les desideratas - conscients et inconscients - des lecteurs… » - toujours selon eux, 2/3 des journalistes n'ont pas les moyens de faire face aux pressions de l'argent ou du politique ; - un Français sur deux pense que les événements ne se sont pas passés comme le décrivent les journalistes ;

5
Mardi 5 Avril La civilisation du lin Par Louis Elégoët Historien du Léon Mardi 12 Avril Un soleil à notre disposition Par Pierre Berlivet Ingénieur en retraite

6
A travers le pays bigouden

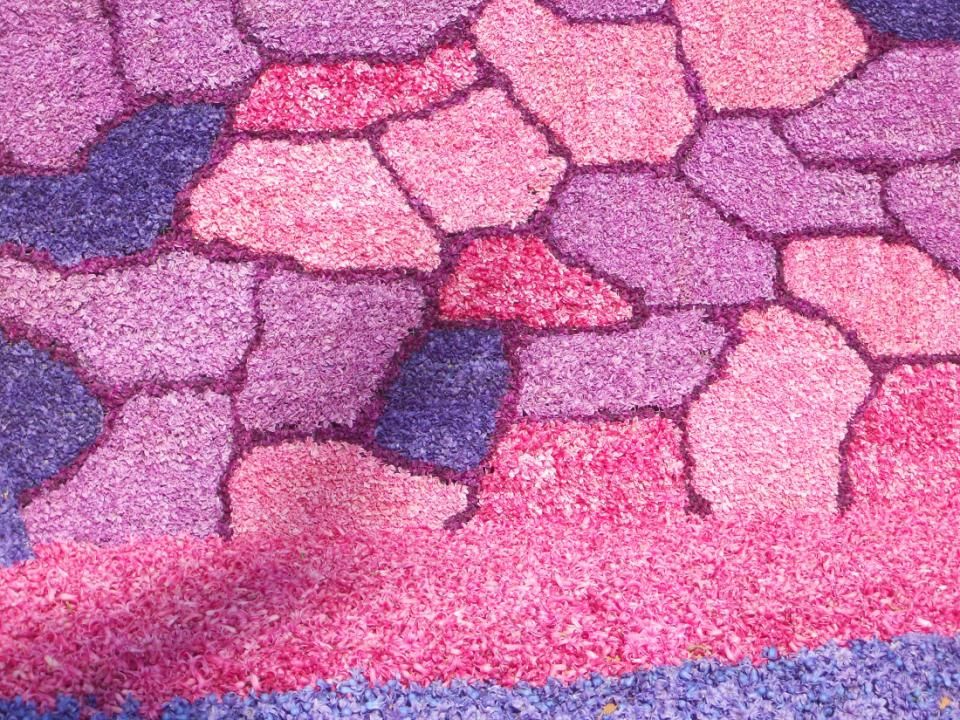
7
Himeji-jo au Japon Himeji-jo à Plomeur
Mosaïque de fleurs de jacinthes sur une structure de métal. Etablissements Kaandorp Himeji-jo au Japon

9
Paul Véricel Joël Saulnier Louis Plantade Yvon Herbreteau
Si vous aussi vous souhaitez partager vos photos, prenez contact sur place avec Paul Véricel Joël Saulnier Louis Plantade Yvon Herbreteau Ou faites parvenir un mail à l’adresse suivante : Ou encore prenez contact par l’intermédiaire de notre site :

10
L’énigme du jour Quel monument a servi de modèle pour la mosaïque de 2004 ? Réponse mardi prochain

11
Réponse à l’énigme de la semaine dernière
Quelle est la signification de cette stèle ? Cette stèle marque le point de départ d’un des trois itinéraires de Bretagne vers Saint Jacques de Compostelle. Elle se trouve à Moguériec, près de Saint Pol de Léon

12
Les itinéraires de Saint Jacques en Bretagne
3 grands itinéraires partent de Bretagne vers Saint Jacques. S’y ajoute un chemin au départ du Mont Saint Michel. Ils rejoignent la via Turonis (Tours) à Saint Jean d’Angély
 à Saint Jean d’Angély.")
13
Forum des adhérents Le groupe d’adhérents qui doit se réunir le 8 avril a été formé sur la base du tirage au sort et du volontariat. Il est maintenant constitué et chacun peut prendre contact avec les membres pour proposer des idées à développer dans le cadre de notre UTL. Animated picture changes during motion path (Advanced) To reproduce the first picture effect on this slide, do the following: On the Home tab, in the Slides group, click Layout and then click Blank. On the Insert tab, in the Images group, click Picture. In the Insert Picture dialog box, select a picture, and then click Insert. Under Picture Tools, on the Format tab, in the bottom right corner of the Size group, click the Size and Position dialog box launcher. In the Format Picture dialog box, resize or crop the picture as needed so that the height is set to 2” and the width is set to 2”. To crop the picture, click Crop in the left pane, and in the Crop pane, under Crop position, enter values into the Height, Width, Left, and Top boxes. To resize the picture, click Size in the left pane, and in the Size pane, under Size and rotate, enter values into the Height and Width boxes. Also in the Format Picture dialog box, click Line Color in the left pane. In the Line Color pane, select Solid line, click the button next to Color, and then under Theme Colors click White, Background 1 (first row, first option from the left). Also in the Format Picture dialog box, click Line Style in the left pane, and then in the Line Style pane, in the Width box, enter 1.5 pt. Also in the Format Picture dialog box, click Shadow in the left pane. In the Shadow pane, click the button next to Presets, and then under Outer click Offset Center (second row, second option from the left). On the slide, select the picture. On the Animations tab, in the Advanced Animation group, click Add Animation, and then under Entrance click Fade. Also on the Animations tab, in the Timing group, do the following: In the Start list, select With Previous. In the Duration list, select 1.00 seconds. Also on the Animations tab, in the Advanced Animation group, click Add Animation, and then under Motion Paths click Lines. Also on the Animations tab, in the Animation group, click Effect Options, and then click Right. In the Start list, select With Previous In the Duration box, enter seconds. On the slide, select the motion path. Press and hold SHIFT to constrain the path to a straight, horizontal line, and then drag the right adjustment handle to the right, stopping approximately 1.5” left of the right edge of the slide. (Note: On the View tab, in the Show/Hide group, select Ruler to measure approximately where the endpoint is on the slide.) To reproduce the other pictures on this slide, do the following: Select the picture. On the Home tab, in the Clipboard group, click the arrow to the right of Copy, and then click Duplicate. Repeat this process for a total of four duplicate pictures. Select a duplicate picture. Under Picture Tools, on the Format tab, in the Adjust group, click Change Picture. In the Insert Picture dialog box, select a new picture, and then click Insert. Under Picture Tools, on the Format tab, in the bottom right corner of the Size group, click the Size and Position dialog box launcherIn the Format Picture dialog box, resize or crop the picture as needed so that the height is set to 2” and the width is set to 2”. Repeat steps 2-4 for the other duplicate pictures. To reproduce the other animation effects on this slide, do the following: On the Animations tab, in the Advanced Animation group, click Animation Pane. In the Animation Pane, select the third animation effect (fade effect for the second picture). On the Animations tab, in the Timing group, in the Delay box, enter 2.5. In the Animation Pane, select the fifth animation effect (fade effect for the third picture). On the Animations tab, in the Timing group, in the Delay box, enter 5. In the Animation Pane, select the seventh animation effect (fade effect for the fourth picture). On the Animations tab, in the Timing group, in the Delay box, enter 7.5. On the slide, press and hold SHIFT and select all four pictures. On the Home tab, in the Drawing group, click Arrange, point to Align, and then do the following: Click Align Selected Objects. Click Align Center. Click Align Middle. Drag the pictures into the top left corner of the slide. To reproduce the background effects on this slide, do the following: On the Home tab, in the Drawing group, click Shapes, and then under Rectangles click Rectangle (first option from the left). On the slide, drag to draw a rectangle. Select the rectangle. Under Drawing Tools, on the Format tab, in the Size group, do the following: In the Shape Height box, enter 3.42”. In the Shape Width box, enter 10”. Under Drawing Tools, on the Format tab, in the Shape Styles group, click the Format Shape dialog box launcher. In the Format Shape dialog box, click Line Color in the left pane, in the Line Color pane, select No line. Also in the Format Shape dialog box, click Fill in the left pane, in the Fill pane, select Gradient fill, and then do the following: In the Type list, select Linear. Click the button next to Direction, and then click Linear Down (first row, second option from the left). Under Gradient stops, click Add gradient stops or Remove gradient stops until two stops appear in the drop-down list. Also under Gradient stops, customize the gradient stops that you added as follows: Select the first stop in the slider, and then do the following: In the Position box, enter 1%. Click the button next to Color, click More Colors, and then in the Colors dialog box, on the Custom tab, enter values for Red: 94, Green: 156, Blue: 198. In the Transparency box, enter 60%. Select the last stop in the slider, and then do the following: In the Position box, enter 100%. In the Transparency box, enter 90%. On the slide, drag the rectangle vertically to position it just above the middle of the slide. On the Home tab, in the Drawing group, click Arrange, and then do the following: Point to Align, and then click Align to Slide. Point to Align, and then click Align Center. Click Send to Back. Right-click the slide background area, and then click Format Background. In the Format Background dialog box, click Fill in the left pane, in the Fill pane, select Gradient fill, and then do the following: Click the button next to Direction, and then click Linear Down (first row, second option from the left) In the Angle box, enter 90⁰. In the Position box, enter 70%. Click the button next to Color, and then click White, Background 1, Darker 5% (second row, first option from the left). Click the button next to Color, and then click White, Background 1, Darker 25% (fourth row, first option from the left).
 To reproduce the first picture effect on this slide, do the following: On the Home tab, in the Slides group, click Layout and then click Blank. On the Insert tab, in the Images group, click Picture. In the Insert Picture dialog box, select a picture, and then click Insert. Under Picture Tools, on the Format tab, in the bottom right corner of the Size group, click the Size and Position dialog box launcher. In the Format Picture dialog box, resize or crop the picture as needed so that the height is set to 2 and the width is set to 2 . To crop the picture, click Crop in the left pane, and in the Crop pane, under Crop position, enter values into the Height, Width, Left, and Top boxes. To resize the picture, click Size in the left pane, and in the Size pane, under Size and rotate, enter values into the Height and Width boxes. Also in the Format Picture dialog box, click Line Color in the left pane. In the Line Color pane, select Solid line, click the button next to Color, and then under Theme Colors click White, Background 1 (first row, first option from the left). Also in the Format Picture dialog box, click Line Style in the left pane, and then in the Line Style pane, in the Width box, enter 1.5 pt. Also in the Format Picture dialog box, click Shadow in the left pane. In the Shadow pane, click the button next to Presets, and then under Outer click Offset Center (second row, second option from the left). On the slide, select the picture. On the Animations tab, in the Advanced Animation group, click Add Animation, and then under Entrance click Fade. Also on the Animations tab, in the Timing group, do the following: In the Start list, select With Previous. In the Duration list, select 1.00 seconds. Also on the Animations tab, in the Advanced Animation group, click Add Animation, and then under Motion Paths click Lines. Also on the Animations tab, in the Animation group, click Effect Options, and then click Right. In the Start list, select With Previous. In the Duration box, enter seconds. On the slide, select the motion path. Press and hold SHIFT to constrain the path to a straight, horizontal line, and then drag the right adjustment handle to the right, stopping approximately 1.5 left of the right edge of the slide. (Note: On the View tab, in the Show/Hide group, select Ruler to measure approximately where the endpoint is on the slide.) To reproduce the other pictures on this slide, do the following: Select the picture. On the Home tab, in the Clipboard group, click the arrow to the right of Copy, and then click Duplicate. Repeat this process for a total of four duplicate pictures. Select a duplicate picture. Under Picture Tools, on the Format tab, in the Adjust group, click Change Picture. In the Insert Picture dialog box, select a new picture, and then click Insert. Under Picture Tools, on the Format tab, in the bottom right corner of the Size group, click the Size and Position dialog box launcherIn the Format Picture dialog box, resize or crop the picture as needed so that the height is set to 2 and the width is set to 2 . Repeat steps 2-4 for the other duplicate pictures. To reproduce the other animation effects on this slide, do the following: On the Animations tab, in the Advanced Animation group, click Animation Pane. In the Animation Pane, select the third animation effect (fade effect for the second picture). On the Animations tab, in the Timing group, in the Delay box, enter 2.5. In the Animation Pane, select the fifth animation effect (fade effect for the third picture). On the Animations tab, in the Timing group, in the Delay box, enter 5. In the Animation Pane, select the seventh animation effect (fade effect for the fourth picture). On the Animations tab, in the Timing group, in the Delay box, enter 7.5. On the slide, press and hold SHIFT and select all four pictures. On the Home tab, in the Drawing group, click Arrange, point to Align, and then do the following: Click Align Selected Objects. Click Align Center. Click Align Middle. Drag the pictures into the top left corner of the slide. To reproduce the background effects on this slide, do the following: On the Home tab, in the Drawing group, click Shapes, and then under Rectangles click Rectangle (first option from the left). On the slide, drag to draw a rectangle. Select the rectangle. Under Drawing Tools, on the Format tab, in the Size group, do the following: In the Shape Height box, enter In the Shape Width box, enter 10 . Under Drawing Tools, on the Format tab, in the Shape Styles group, click the Format Shape dialog box launcher. In the Format Shape dialog box, click Line Color in the left pane, in the Line Color pane, select No line. Also in the Format Shape dialog box, click Fill in the left pane, in the Fill pane, select Gradient fill, and then do the following: In the Type list, select Linear. Click the button next to Direction, and then click Linear Down (first row, second option from the left). Under Gradient stops, click Add gradient stops or Remove gradient stops until two stops appear in the drop-down list. Also under Gradient stops, customize the gradient stops that you added as follows: Select the first stop in the slider, and then do the following: In the Position box, enter 1%. Click the button next to Color, click More Colors, and then in the Colors dialog box, on the Custom tab, enter values for Red: 94, Green: 156, Blue: 198. In the Transparency box, enter 60%. Select the last stop in the slider, and then do the following: In the Position box, enter 100%. In the Transparency box, enter 90%. On the slide, drag the rectangle vertically to position it just above the middle of the slide. On the Home tab, in the Drawing group, click Arrange, and then do the following: Point to Align, and then click Align to Slide. Point to Align, and then click Align Center. Click Send to Back. Right-click the slide background area, and then click Format Background. In the Format Background dialog box, click Fill in the left pane, in the Fill pane, select Gradient fill, and then do the following: Click the button next to Direction, and then click Linear Down (first row, second option from the left) In the Angle box, enter 90⁰. In the Position box, enter 70%. Click the button next to Color, and then click White, Background 1, Darker 5% (second row, first option from the left). Click the button next to Color, and then click White, Background 1, Darker 25% (fourth row, first option from the left).")
14
Liste des participants au forum
Geneviève Arzul Sébastien Bodéré Gisèle Callarec André Castric Jean-Pierre Corvellec Anne-Marie Daniel Jacqueline Durant Liliane Firmin Marie-Claire Gouzien Agnès Guiziou Monique Jézéquel Michel Labidurie Eliane Le Berre Annick Lespagnol-Crenn Jean-Claude Martin Denise Riou Renée Rohel Monique Thomas Georges Trébern Brigitte Youinou Animated picture changes during motion path (Advanced) To reproduce the first picture effect on this slide, do the following: On the Home tab, in the Slides group, click Layout and then click Blank. On the Insert tab, in the Images group, click Picture. In the Insert Picture dialog box, select a picture, and then click Insert. Under Picture Tools, on the Format tab, in the bottom right corner of the Size group, click the Size and Position dialog box launcher. In the Format Picture dialog box, resize or crop the picture as needed so that the height is set to 2” and the width is set to 2”. To crop the picture, click Crop in the left pane, and in the Crop pane, under Crop position, enter values into the Height, Width, Left, and Top boxes. To resize the picture, click Size in the left pane, and in the Size pane, under Size and rotate, enter values into the Height and Width boxes. Also in the Format Picture dialog box, click Line Color in the left pane. In the Line Color pane, select Solid line, click the button next to Color, and then under Theme Colors click White, Background 1 (first row, first option from the left). Also in the Format Picture dialog box, click Line Style in the left pane, and then in the Line Style pane, in the Width box, enter 1.5 pt. Also in the Format Picture dialog box, click Shadow in the left pane. In the Shadow pane, click the button next to Presets, and then under Outer click Offset Center (second row, second option from the left). On the slide, select the picture. On the Animations tab, in the Advanced Animation group, click Add Animation, and then under Entrance click Fade. Also on the Animations tab, in the Timing group, do the following: In the Start list, select With Previous. In the Duration list, select 1.00 seconds. Also on the Animations tab, in the Advanced Animation group, click Add Animation, and then under Motion Paths click Lines. Also on the Animations tab, in the Animation group, click Effect Options, and then click Right. In the Start list, select With Previous In the Duration box, enter seconds. On the slide, select the motion path. Press and hold SHIFT to constrain the path to a straight, horizontal line, and then drag the right adjustment handle to the right, stopping approximately 1.5” left of the right edge of the slide. (Note: On the View tab, in the Show/Hide group, select Ruler to measure approximately where the endpoint is on the slide.) To reproduce the other pictures on this slide, do the following: Select the picture. On the Home tab, in the Clipboard group, click the arrow to the right of Copy, and then click Duplicate. Repeat this process for a total of four duplicate pictures. Select a duplicate picture. Under Picture Tools, on the Format tab, in the Adjust group, click Change Picture. In the Insert Picture dialog box, select a new picture, and then click Insert. Under Picture Tools, on the Format tab, in the bottom right corner of the Size group, click the Size and Position dialog box launcherIn the Format Picture dialog box, resize or crop the picture as needed so that the height is set to 2” and the width is set to 2”. Repeat steps 2-4 for the other duplicate pictures. To reproduce the other animation effects on this slide, do the following: On the Animations tab, in the Advanced Animation group, click Animation Pane. In the Animation Pane, select the third animation effect (fade effect for the second picture). On the Animations tab, in the Timing group, in the Delay box, enter 2.5. In the Animation Pane, select the fifth animation effect (fade effect for the third picture). On the Animations tab, in the Timing group, in the Delay box, enter 5. In the Animation Pane, select the seventh animation effect (fade effect for the fourth picture). On the Animations tab, in the Timing group, in the Delay box, enter 7.5. On the slide, press and hold SHIFT and select all four pictures. On the Home tab, in the Drawing group, click Arrange, point to Align, and then do the following: Click Align Selected Objects. Click Align Center. Click Align Middle. Drag the pictures into the top left corner of the slide. To reproduce the background effects on this slide, do the following: On the Home tab, in the Drawing group, click Shapes, and then under Rectangles click Rectangle (first option from the left). On the slide, drag to draw a rectangle. Select the rectangle. Under Drawing Tools, on the Format tab, in the Size group, do the following: In the Shape Height box, enter 3.42”. In the Shape Width box, enter 10”. Under Drawing Tools, on the Format tab, in the Shape Styles group, click the Format Shape dialog box launcher. In the Format Shape dialog box, click Line Color in the left pane, in the Line Color pane, select No line. Also in the Format Shape dialog box, click Fill in the left pane, in the Fill pane, select Gradient fill, and then do the following: In the Type list, select Linear. Click the button next to Direction, and then click Linear Down (first row, second option from the left). Under Gradient stops, click Add gradient stops or Remove gradient stops until two stops appear in the drop-down list. Also under Gradient stops, customize the gradient stops that you added as follows: Select the first stop in the slider, and then do the following: In the Position box, enter 1%. Click the button next to Color, click More Colors, and then in the Colors dialog box, on the Custom tab, enter values for Red: 94, Green: 156, Blue: 198. In the Transparency box, enter 60%. Select the last stop in the slider, and then do the following: In the Position box, enter 100%. In the Transparency box, enter 90%. On the slide, drag the rectangle vertically to position it just above the middle of the slide. On the Home tab, in the Drawing group, click Arrange, and then do the following: Point to Align, and then click Align to Slide. Point to Align, and then click Align Center. Click Send to Back. Right-click the slide background area, and then click Format Background. In the Format Background dialog box, click Fill in the left pane, in the Fill pane, select Gradient fill, and then do the following: Click the button next to Direction, and then click Linear Down (first row, second option from the left) In the Angle box, enter 90⁰. In the Position box, enter 70%. Click the button next to Color, and then click White, Background 1, Darker 5% (second row, first option from the left). Click the button next to Color, and then click White, Background 1, Darker 25% (fourth row, first option from the left).
 To reproduce the first picture effect on this slide, do the following: On the Home tab, in the Slides group, click Layout and then click Blank. On the Insert tab, in the Images group, click Picture. In the Insert Picture dialog box, select a picture, and then click Insert. Under Picture Tools, on the Format tab, in the bottom right corner of the Size group, click the Size and Position dialog box launcher. In the Format Picture dialog box, resize or crop the picture as needed so that the height is set to 2 and the width is set to 2 . To crop the picture, click Crop in the left pane, and in the Crop pane, under Crop position, enter values into the Height, Width, Left, and Top boxes. To resize the picture, click Size in the left pane, and in the Size pane, under Size and rotate, enter values into the Height and Width boxes. Also in the Format Picture dialog box, click Line Color in the left pane. In the Line Color pane, select Solid line, click the button next to Color, and then under Theme Colors click White, Background 1 (first row, first option from the left). Also in the Format Picture dialog box, click Line Style in the left pane, and then in the Line Style pane, in the Width box, enter 1.5 pt. Also in the Format Picture dialog box, click Shadow in the left pane. In the Shadow pane, click the button next to Presets, and then under Outer click Offset Center (second row, second option from the left). On the slide, select the picture. On the Animations tab, in the Advanced Animation group, click Add Animation, and then under Entrance click Fade. Also on the Animations tab, in the Timing group, do the following: In the Start list, select With Previous. In the Duration list, select 1.00 seconds. Also on the Animations tab, in the Advanced Animation group, click Add Animation, and then under Motion Paths click Lines. Also on the Animations tab, in the Animation group, click Effect Options, and then click Right. In the Start list, select With Previous. In the Duration box, enter seconds. On the slide, select the motion path. Press and hold SHIFT to constrain the path to a straight, horizontal line, and then drag the right adjustment handle to the right, stopping approximately 1.5 left of the right edge of the slide. (Note: On the View tab, in the Show/Hide group, select Ruler to measure approximately where the endpoint is on the slide.) To reproduce the other pictures on this slide, do the following: Select the picture. On the Home tab, in the Clipboard group, click the arrow to the right of Copy, and then click Duplicate. Repeat this process for a total of four duplicate pictures. Select a duplicate picture. Under Picture Tools, on the Format tab, in the Adjust group, click Change Picture. In the Insert Picture dialog box, select a new picture, and then click Insert. Under Picture Tools, on the Format tab, in the bottom right corner of the Size group, click the Size and Position dialog box launcherIn the Format Picture dialog box, resize or crop the picture as needed so that the height is set to 2 and the width is set to 2 . Repeat steps 2-4 for the other duplicate pictures. To reproduce the other animation effects on this slide, do the following: On the Animations tab, in the Advanced Animation group, click Animation Pane. In the Animation Pane, select the third animation effect (fade effect for the second picture). On the Animations tab, in the Timing group, in the Delay box, enter 2.5. In the Animation Pane, select the fifth animation effect (fade effect for the third picture). On the Animations tab, in the Timing group, in the Delay box, enter 5. In the Animation Pane, select the seventh animation effect (fade effect for the fourth picture). On the Animations tab, in the Timing group, in the Delay box, enter 7.5. On the slide, press and hold SHIFT and select all four pictures. On the Home tab, in the Drawing group, click Arrange, point to Align, and then do the following: Click Align Selected Objects. Click Align Center. Click Align Middle. Drag the pictures into the top left corner of the slide. To reproduce the background effects on this slide, do the following: On the Home tab, in the Drawing group, click Shapes, and then under Rectangles click Rectangle (first option from the left). On the slide, drag to draw a rectangle. Select the rectangle. Under Drawing Tools, on the Format tab, in the Size group, do the following: In the Shape Height box, enter In the Shape Width box, enter 10 . Under Drawing Tools, on the Format tab, in the Shape Styles group, click the Format Shape dialog box launcher. In the Format Shape dialog box, click Line Color in the left pane, in the Line Color pane, select No line. Also in the Format Shape dialog box, click Fill in the left pane, in the Fill pane, select Gradient fill, and then do the following: In the Type list, select Linear. Click the button next to Direction, and then click Linear Down (first row, second option from the left). Under Gradient stops, click Add gradient stops or Remove gradient stops until two stops appear in the drop-down list. Also under Gradient stops, customize the gradient stops that you added as follows: Select the first stop in the slider, and then do the following: In the Position box, enter 1%. Click the button next to Color, click More Colors, and then in the Colors dialog box, on the Custom tab, enter values for Red: 94, Green: 156, Blue: 198. In the Transparency box, enter 60%. Select the last stop in the slider, and then do the following: In the Position box, enter 100%. In the Transparency box, enter 90%. On the slide, drag the rectangle vertically to position it just above the middle of the slide. On the Home tab, in the Drawing group, click Arrange, and then do the following: Point to Align, and then click Align to Slide. Point to Align, and then click Align Center. Click Send to Back. Right-click the slide background area, and then click Format Background. In the Format Background dialog box, click Fill in the left pane, in the Fill pane, select Gradient fill, and then do the following: Click the button next to Direction, and then click Linear Down (first row, second option from the left) In the Angle box, enter 90⁰. In the Position box, enter 70%. Click the button next to Color, and then click White, Background 1, Darker 5% (second row, first option from the left). Click the button next to Color, and then click White, Background 1, Darker 25% (fourth row, first option from the left).")
15
A défaut de rencontrer personnellement un participant au forum, vous pouvez aussi mettre vos propositions par écrit et les donner à un membre du bureau ou de la commission prospective qui fera suivre…

16
Sorties proposées dans les différentes UTL de Bretagne
Sorties à la journée pour visiter une ville (par exemple Nantes) ou un secteur géographique typique (par exemple les enclos paroissiaux) Sorties à la demi-journée autour d’une exposition, d’un monument ou d’un établissement Animated picture changes during motion path (Advanced) To reproduce the first picture effect on this slide, do the following: On the Home tab, in the Slides group, click Layout and then click Blank. On the Insert tab, in the Images group, click Picture. In the Insert Picture dialog box, select a picture, and then click Insert. Under Picture Tools, on the Format tab, in the bottom right corner of the Size group, click the Size and Position dialog box launcher. In the Format Picture dialog box, resize or crop the picture as needed so that the height is set to 2” and the width is set to 2”. To crop the picture, click Crop in the left pane, and in the Crop pane, under Crop position, enter values into the Height, Width, Left, and Top boxes. To resize the picture, click Size in the left pane, and in the Size pane, under Size and rotate, enter values into the Height and Width boxes. Also in the Format Picture dialog box, click Line Color in the left pane. In the Line Color pane, select Solid line, click the button next to Color, and then under Theme Colors click White, Background 1 (first row, first option from the left). Also in the Format Picture dialog box, click Line Style in the left pane, and then in the Line Style pane, in the Width box, enter 1.5 pt. Also in the Format Picture dialog box, click Shadow in the left pane. In the Shadow pane, click the button next to Presets, and then under Outer click Offset Center (second row, second option from the left). On the slide, select the picture. On the Animations tab, in the Advanced Animation group, click Add Animation, and then under Entrance click Fade. Also on the Animations tab, in the Timing group, do the following: In the Start list, select With Previous. In the Duration list, select 1.00 seconds. Also on the Animations tab, in the Advanced Animation group, click Add Animation, and then under Motion Paths click Lines. Also on the Animations tab, in the Animation group, click Effect Options, and then click Right. In the Start list, select With Previous In the Duration box, enter seconds. On the slide, select the motion path. Press and hold SHIFT to constrain the path to a straight, horizontal line, and then drag the right adjustment handle to the right, stopping approximately 1.5” left of the right edge of the slide. (Note: On the View tab, in the Show/Hide group, select Ruler to measure approximately where the endpoint is on the slide.) To reproduce the other pictures on this slide, do the following: Select the picture. On the Home tab, in the Clipboard group, click the arrow to the right of Copy, and then click Duplicate. Repeat this process for a total of four duplicate pictures. Select a duplicate picture. Under Picture Tools, on the Format tab, in the Adjust group, click Change Picture. In the Insert Picture dialog box, select a new picture, and then click Insert. Under Picture Tools, on the Format tab, in the bottom right corner of the Size group, click the Size and Position dialog box launcherIn the Format Picture dialog box, resize or crop the picture as needed so that the height is set to 2” and the width is set to 2”. Repeat steps 2-4 for the other duplicate pictures. To reproduce the other animation effects on this slide, do the following: On the Animations tab, in the Advanced Animation group, click Animation Pane. In the Animation Pane, select the third animation effect (fade effect for the second picture). On the Animations tab, in the Timing group, in the Delay box, enter 2.5. In the Animation Pane, select the fifth animation effect (fade effect for the third picture). On the Animations tab, in the Timing group, in the Delay box, enter 5. In the Animation Pane, select the seventh animation effect (fade effect for the fourth picture). On the Animations tab, in the Timing group, in the Delay box, enter 7.5. On the slide, press and hold SHIFT and select all four pictures. On the Home tab, in the Drawing group, click Arrange, point to Align, and then do the following: Click Align Selected Objects. Click Align Center. Click Align Middle. Drag the pictures into the top left corner of the slide. To reproduce the background effects on this slide, do the following: On the Home tab, in the Drawing group, click Shapes, and then under Rectangles click Rectangle (first option from the left). On the slide, drag to draw a rectangle. Select the rectangle. Under Drawing Tools, on the Format tab, in the Size group, do the following: In the Shape Height box, enter 3.42”. In the Shape Width box, enter 10”. Under Drawing Tools, on the Format tab, in the Shape Styles group, click the Format Shape dialog box launcher. In the Format Shape dialog box, click Line Color in the left pane, in the Line Color pane, select No line. Also in the Format Shape dialog box, click Fill in the left pane, in the Fill pane, select Gradient fill, and then do the following: In the Type list, select Linear. Click the button next to Direction, and then click Linear Down (first row, second option from the left). Under Gradient stops, click Add gradient stops or Remove gradient stops until two stops appear in the drop-down list. Also under Gradient stops, customize the gradient stops that you added as follows: Select the first stop in the slider, and then do the following: In the Position box, enter 1%. Click the button next to Color, click More Colors, and then in the Colors dialog box, on the Custom tab, enter values for Red: 94, Green: 156, Blue: 198. In the Transparency box, enter 60%. Select the last stop in the slider, and then do the following: In the Position box, enter 100%. In the Transparency box, enter 90%. On the slide, drag the rectangle vertically to position it just above the middle of the slide. On the Home tab, in the Drawing group, click Arrange, and then do the following: Point to Align, and then click Align to Slide. Point to Align, and then click Align Center. Click Send to Back. Right-click the slide background area, and then click Format Background. In the Format Background dialog box, click Fill in the left pane, in the Fill pane, select Gradient fill, and then do the following: Click the button next to Direction, and then click Linear Down (first row, second option from the left) In the Angle box, enter 90⁰. In the Position box, enter 70%. Click the button next to Color, and then click White, Background 1, Darker 5% (second row, first option from the left). Click the button next to Color, and then click White, Background 1, Darker 25% (fourth row, first option from the left).
 ou un secteur géographique typique (par exemple les enclos paroissiaux) Sorties à la demi-journée autour d’une exposition, d’un monument ou d’un établissement. Animated picture changes during motion path. (Advanced) To reproduce the first picture effect on this slide, do the following: On the Home tab, in the Slides group, click Layout and then click Blank. On the Insert tab, in the Images group, click Picture. In the Insert Picture dialog box, select a picture, and then click Insert. Under Picture Tools, on the Format tab, in the bottom right corner of the Size group, click the Size and Position dialog box launcher. In the Format Picture dialog box, resize or crop the picture as needed so that the height is set to 2 and the width is set to 2 . To crop the picture, click Crop in the left pane, and in the Crop pane, under Crop position, enter values into the Height, Width, Left, and Top boxes. To resize the picture, click Size in the left pane, and in the Size pane, under Size and rotate, enter values into the Height and Width boxes. Also in the Format Picture dialog box, click Line Color in the left pane. In the Line Color pane, select Solid line, click the button next to Color, and then under Theme Colors click White, Background 1 (first row, first option from the left). Also in the Format Picture dialog box, click Line Style in the left pane, and then in the Line Style pane, in the Width box, enter 1.5 pt. Also in the Format Picture dialog box, click Shadow in the left pane. In the Shadow pane, click the button next to Presets, and then under Outer click Offset Center (second row, second option from the left). On the slide, select the picture. On the Animations tab, in the Advanced Animation group, click Add Animation, and then under Entrance click Fade. Also on the Animations tab, in the Timing group, do the following: In the Start list, select With Previous. In the Duration list, select 1.00 seconds. Also on the Animations tab, in the Advanced Animation group, click Add Animation, and then under Motion Paths click Lines. Also on the Animations tab, in the Animation group, click Effect Options, and then click Right. In the Start list, select With Previous. In the Duration box, enter seconds. On the slide, select the motion path. Press and hold SHIFT to constrain the path to a straight, horizontal line, and then drag the right adjustment handle to the right, stopping approximately 1.5 left of the right edge of the slide. (Note: On the View tab, in the Show/Hide group, select Ruler to measure approximately where the endpoint is on the slide.) To reproduce the other pictures on this slide, do the following: Select the picture. On the Home tab, in the Clipboard group, click the arrow to the right of Copy, and then click Duplicate. Repeat this process for a total of four duplicate pictures. Select a duplicate picture. Under Picture Tools, on the Format tab, in the Adjust group, click Change Picture. In the Insert Picture dialog box, select a new picture, and then click Insert. Under Picture Tools, on the Format tab, in the bottom right corner of the Size group, click the Size and Position dialog box launcherIn the Format Picture dialog box, resize or crop the picture as needed so that the height is set to 2 and the width is set to 2 . Repeat steps 2-4 for the other duplicate pictures. To reproduce the other animation effects on this slide, do the following: On the Animations tab, in the Advanced Animation group, click Animation Pane. In the Animation Pane, select the third animation effect (fade effect for the second picture). On the Animations tab, in the Timing group, in the Delay box, enter 2.5. In the Animation Pane, select the fifth animation effect (fade effect for the third picture). On the Animations tab, in the Timing group, in the Delay box, enter 5. In the Animation Pane, select the seventh animation effect (fade effect for the fourth picture). On the Animations tab, in the Timing group, in the Delay box, enter 7.5. On the slide, press and hold SHIFT and select all four pictures. On the Home tab, in the Drawing group, click Arrange, point to Align, and then do the following: Click Align Selected Objects. Click Align Center. Click Align Middle. Drag the pictures into the top left corner of the slide. To reproduce the background effects on this slide, do the following: On the Home tab, in the Drawing group, click Shapes, and then under Rectangles click Rectangle (first option from the left). On the slide, drag to draw a rectangle. Select the rectangle. Under Drawing Tools, on the Format tab, in the Size group, do the following: In the Shape Height box, enter In the Shape Width box, enter 10 . Under Drawing Tools, on the Format tab, in the Shape Styles group, click the Format Shape dialog box launcher. In the Format Shape dialog box, click Line Color in the left pane, in the Line Color pane, select No line. Also in the Format Shape dialog box, click Fill in the left pane, in the Fill pane, select Gradient fill, and then do the following: In the Type list, select Linear. Click the button next to Direction, and then click Linear Down (first row, second option from the left). Under Gradient stops, click Add gradient stops or Remove gradient stops until two stops appear in the drop-down list. Also under Gradient stops, customize the gradient stops that you added as follows: Select the first stop in the slider, and then do the following: In the Position box, enter 1%. Click the button next to Color, click More Colors, and then in the Colors dialog box, on the Custom tab, enter values for Red: 94, Green: 156, Blue: 198. In the Transparency box, enter 60%. Select the last stop in the slider, and then do the following: In the Position box, enter 100%. In the Transparency box, enter 90%. On the slide, drag the rectangle vertically to position it just above the middle of the slide. On the Home tab, in the Drawing group, click Arrange, and then do the following: Point to Align, and then click Align to Slide. Point to Align, and then click Align Center. Click Send to Back. Right-click the slide background area, and then click Format Background. In the Format Background dialog box, click Fill in the left pane, in the Fill pane, select Gradient fill, and then do the following: Click the button next to Direction, and then click Linear Down (first row, second option from the left) In the Angle box, enter 90⁰. In the Position box, enter 70%. Click the button next to Color, and then click White, Background 1, Darker 5% (second row, first option from the left). Click the button next to Color, and then click White, Background 1, Darker 25% (fourth row, first option from the left).")
17
Sorties de type randonnées pour découvrir un secteur pittoresque
Sorties spectacles pour un grand spectacle national de passage dans notre région Sorties de type randonnées pour découvrir un secteur pittoresque Animated picture changes during motion path (Advanced) To reproduce the first picture effect on this slide, do the following: On the Home tab, in the Slides group, click Layout and then click Blank. On the Insert tab, in the Images group, click Picture. In the Insert Picture dialog box, select a picture, and then click Insert. Under Picture Tools, on the Format tab, in the bottom right corner of the Size group, click the Size and Position dialog box launcher. In the Format Picture dialog box, resize or crop the picture as needed so that the height is set to 2” and the width is set to 2”. To crop the picture, click Crop in the left pane, and in the Crop pane, under Crop position, enter values into the Height, Width, Left, and Top boxes. To resize the picture, click Size in the left pane, and in the Size pane, under Size and rotate, enter values into the Height and Width boxes. Also in the Format Picture dialog box, click Line Color in the left pane. In the Line Color pane, select Solid line, click the button next to Color, and then under Theme Colors click White, Background 1 (first row, first option from the left). Also in the Format Picture dialog box, click Line Style in the left pane, and then in the Line Style pane, in the Width box, enter 1.5 pt. Also in the Format Picture dialog box, click Shadow in the left pane. In the Shadow pane, click the button next to Presets, and then under Outer click Offset Center (second row, second option from the left). On the slide, select the picture. On the Animations tab, in the Advanced Animation group, click Add Animation, and then under Entrance click Fade. Also on the Animations tab, in the Timing group, do the following: In the Start list, select With Previous. In the Duration list, select 1.00 seconds. Also on the Animations tab, in the Advanced Animation group, click Add Animation, and then under Motion Paths click Lines. Also on the Animations tab, in the Animation group, click Effect Options, and then click Right. In the Start list, select With Previous In the Duration box, enter seconds. On the slide, select the motion path. Press and hold SHIFT to constrain the path to a straight, horizontal line, and then drag the right adjustment handle to the right, stopping approximately 1.5” left of the right edge of the slide. (Note: On the View tab, in the Show/Hide group, select Ruler to measure approximately where the endpoint is on the slide.) To reproduce the other pictures on this slide, do the following: Select the picture. On the Home tab, in the Clipboard group, click the arrow to the right of Copy, and then click Duplicate. Repeat this process for a total of four duplicate pictures. Select a duplicate picture. Under Picture Tools, on the Format tab, in the Adjust group, click Change Picture. In the Insert Picture dialog box, select a new picture, and then click Insert. Under Picture Tools, on the Format tab, in the bottom right corner of the Size group, click the Size and Position dialog box launcherIn the Format Picture dialog box, resize or crop the picture as needed so that the height is set to 2” and the width is set to 2”. Repeat steps 2-4 for the other duplicate pictures. To reproduce the other animation effects on this slide, do the following: On the Animations tab, in the Advanced Animation group, click Animation Pane. In the Animation Pane, select the third animation effect (fade effect for the second picture). On the Animations tab, in the Timing group, in the Delay box, enter 2.5. In the Animation Pane, select the fifth animation effect (fade effect for the third picture). On the Animations tab, in the Timing group, in the Delay box, enter 5. In the Animation Pane, select the seventh animation effect (fade effect for the fourth picture). On the Animations tab, in the Timing group, in the Delay box, enter 7.5. On the slide, press and hold SHIFT and select all four pictures. On the Home tab, in the Drawing group, click Arrange, point to Align, and then do the following: Click Align Selected Objects. Click Align Center. Click Align Middle. Drag the pictures into the top left corner of the slide. To reproduce the background effects on this slide, do the following: On the Home tab, in the Drawing group, click Shapes, and then under Rectangles click Rectangle (first option from the left). On the slide, drag to draw a rectangle. Select the rectangle. Under Drawing Tools, on the Format tab, in the Size group, do the following: In the Shape Height box, enter 3.42”. In the Shape Width box, enter 10”. Under Drawing Tools, on the Format tab, in the Shape Styles group, click the Format Shape dialog box launcher. In the Format Shape dialog box, click Line Color in the left pane, in the Line Color pane, select No line. Also in the Format Shape dialog box, click Fill in the left pane, in the Fill pane, select Gradient fill, and then do the following: In the Type list, select Linear. Click the button next to Direction, and then click Linear Down (first row, second option from the left). Under Gradient stops, click Add gradient stops or Remove gradient stops until two stops appear in the drop-down list. Also under Gradient stops, customize the gradient stops that you added as follows: Select the first stop in the slider, and then do the following: In the Position box, enter 1%. Click the button next to Color, click More Colors, and then in the Colors dialog box, on the Custom tab, enter values for Red: 94, Green: 156, Blue: 198. In the Transparency box, enter 60%. Select the last stop in the slider, and then do the following: In the Position box, enter 100%. In the Transparency box, enter 90%. On the slide, drag the rectangle vertically to position it just above the middle of the slide. On the Home tab, in the Drawing group, click Arrange, and then do the following: Point to Align, and then click Align to Slide. Point to Align, and then click Align Center. Click Send to Back. Right-click the slide background area, and then click Format Background. In the Format Background dialog box, click Fill in the left pane, in the Fill pane, select Gradient fill, and then do the following: Click the button next to Direction, and then click Linear Down (first row, second option from the left) In the Angle box, enter 90⁰. In the Position box, enter 70%. Click the button next to Color, and then click White, Background 1, Darker 5% (second row, first option from the left). Click the button next to Color, and then click White, Background 1, Darker 25% (fourth row, first option from the left).
 To reproduce the first picture effect on this slide, do the following: On the Home tab, in the Slides group, click Layout and then click Blank. On the Insert tab, in the Images group, click Picture. In the Insert Picture dialog box, select a picture, and then click Insert. Under Picture Tools, on the Format tab, in the bottom right corner of the Size group, click the Size and Position dialog box launcher. In the Format Picture dialog box, resize or crop the picture as needed so that the height is set to 2 and the width is set to 2 . To crop the picture, click Crop in the left pane, and in the Crop pane, under Crop position, enter values into the Height, Width, Left, and Top boxes. To resize the picture, click Size in the left pane, and in the Size pane, under Size and rotate, enter values into the Height and Width boxes. Also in the Format Picture dialog box, click Line Color in the left pane. In the Line Color pane, select Solid line, click the button next to Color, and then under Theme Colors click White, Background 1 (first row, first option from the left). Also in the Format Picture dialog box, click Line Style in the left pane, and then in the Line Style pane, in the Width box, enter 1.5 pt. Also in the Format Picture dialog box, click Shadow in the left pane. In the Shadow pane, click the button next to Presets, and then under Outer click Offset Center (second row, second option from the left). On the slide, select the picture. On the Animations tab, in the Advanced Animation group, click Add Animation, and then under Entrance click Fade. Also on the Animations tab, in the Timing group, do the following: In the Start list, select With Previous. In the Duration list, select 1.00 seconds. Also on the Animations tab, in the Advanced Animation group, click Add Animation, and then under Motion Paths click Lines. Also on the Animations tab, in the Animation group, click Effect Options, and then click Right. In the Start list, select With Previous. In the Duration box, enter seconds. On the slide, select the motion path. Press and hold SHIFT to constrain the path to a straight, horizontal line, and then drag the right adjustment handle to the right, stopping approximately 1.5 left of the right edge of the slide. (Note: On the View tab, in the Show/Hide group, select Ruler to measure approximately where the endpoint is on the slide.) To reproduce the other pictures on this slide, do the following: Select the picture. On the Home tab, in the Clipboard group, click the arrow to the right of Copy, and then click Duplicate. Repeat this process for a total of four duplicate pictures. Select a duplicate picture. Under Picture Tools, on the Format tab, in the Adjust group, click Change Picture. In the Insert Picture dialog box, select a new picture, and then click Insert. Under Picture Tools, on the Format tab, in the bottom right corner of the Size group, click the Size and Position dialog box launcherIn the Format Picture dialog box, resize or crop the picture as needed so that the height is set to 2 and the width is set to 2 . Repeat steps 2-4 for the other duplicate pictures. To reproduce the other animation effects on this slide, do the following: On the Animations tab, in the Advanced Animation group, click Animation Pane. In the Animation Pane, select the third animation effect (fade effect for the second picture). On the Animations tab, in the Timing group, in the Delay box, enter 2.5. In the Animation Pane, select the fifth animation effect (fade effect for the third picture). On the Animations tab, in the Timing group, in the Delay box, enter 5. In the Animation Pane, select the seventh animation effect (fade effect for the fourth picture). On the Animations tab, in the Timing group, in the Delay box, enter 7.5. On the slide, press and hold SHIFT and select all four pictures. On the Home tab, in the Drawing group, click Arrange, point to Align, and then do the following: Click Align Selected Objects. Click Align Center. Click Align Middle. Drag the pictures into the top left corner of the slide. To reproduce the background effects on this slide, do the following: On the Home tab, in the Drawing group, click Shapes, and then under Rectangles click Rectangle (first option from the left). On the slide, drag to draw a rectangle. Select the rectangle. Under Drawing Tools, on the Format tab, in the Size group, do the following: In the Shape Height box, enter In the Shape Width box, enter 10 . Under Drawing Tools, on the Format tab, in the Shape Styles group, click the Format Shape dialog box launcher. In the Format Shape dialog box, click Line Color in the left pane, in the Line Color pane, select No line. Also in the Format Shape dialog box, click Fill in the left pane, in the Fill pane, select Gradient fill, and then do the following: In the Type list, select Linear. Click the button next to Direction, and then click Linear Down (first row, second option from the left). Under Gradient stops, click Add gradient stops or Remove gradient stops until two stops appear in the drop-down list. Also under Gradient stops, customize the gradient stops that you added as follows: Select the first stop in the slider, and then do the following: In the Position box, enter 1%. Click the button next to Color, click More Colors, and then in the Colors dialog box, on the Custom tab, enter values for Red: 94, Green: 156, Blue: 198. In the Transparency box, enter 60%. Select the last stop in the slider, and then do the following: In the Position box, enter 100%. In the Transparency box, enter 90%. On the slide, drag the rectangle vertically to position it just above the middle of the slide. On the Home tab, in the Drawing group, click Arrange, and then do the following: Point to Align, and then click Align to Slide. Point to Align, and then click Align Center. Click Send to Back. Right-click the slide background area, and then click Format Background. In the Format Background dialog box, click Fill in the left pane, in the Fill pane, select Gradient fill, and then do the following: Click the button next to Direction, and then click Linear Down (first row, second option from the left) In the Angle box, enter 90⁰. In the Position box, enter 70%. Click the button next to Color, and then click White, Background 1, Darker 5% (second row, first option from the left). Click the button next to Color, and then click White, Background 1, Darker 25% (fourth row, first option from the left).")
18
Un handicap pour l’UTL du pays Bigouden L’effet Pen ar Bed
Nos destinations sont limitées au quadrant Nord-Est Animated picture changes during motion path (Advanced) To reproduce the first picture effect on this slide, do the following: On the Home tab, in the Slides group, click Layout and then click Blank. On the Insert tab, in the Images group, click Picture. In the Insert Picture dialog box, select a picture, and then click Insert. Under Picture Tools, on the Format tab, in the bottom right corner of the Size group, click the Size and Position dialog box launcher. In the Format Picture dialog box, resize or crop the picture as needed so that the height is set to 2” and the width is set to 2”. To crop the picture, click Crop in the left pane, and in the Crop pane, under Crop position, enter values into the Height, Width, Left, and Top boxes. To resize the picture, click Size in the left pane, and in the Size pane, under Size and rotate, enter values into the Height and Width boxes. Also in the Format Picture dialog box, click Line Color in the left pane. In the Line Color pane, select Solid line, click the button next to Color, and then under Theme Colors click White, Background 1 (first row, first option from the left). Also in the Format Picture dialog box, click Line Style in the left pane, and then in the Line Style pane, in the Width box, enter 1.5 pt. Also in the Format Picture dialog box, click Shadow in the left pane. In the Shadow pane, click the button next to Presets, and then under Outer click Offset Center (second row, second option from the left). On the slide, select the picture. On the Animations tab, in the Advanced Animation group, click Add Animation, and then under Entrance click Fade. Also on the Animations tab, in the Timing group, do the following: In the Start list, select With Previous. In the Duration list, select 1.00 seconds. Also on the Animations tab, in the Advanced Animation group, click Add Animation, and then under Motion Paths click Lines. Also on the Animations tab, in the Animation group, click Effect Options, and then click Right. In the Start list, select With Previous In the Duration box, enter seconds. On the slide, select the motion path. Press and hold SHIFT to constrain the path to a straight, horizontal line, and then drag the right adjustment handle to the right, stopping approximately 1.5” left of the right edge of the slide. (Note: On the View tab, in the Show/Hide group, select Ruler to measure approximately where the endpoint is on the slide.) To reproduce the other pictures on this slide, do the following: Select the picture. On the Home tab, in the Clipboard group, click the arrow to the right of Copy, and then click Duplicate. Repeat this process for a total of four duplicate pictures. Select a duplicate picture. Under Picture Tools, on the Format tab, in the Adjust group, click Change Picture. In the Insert Picture dialog box, select a new picture, and then click Insert. Under Picture Tools, on the Format tab, in the bottom right corner of the Size group, click the Size and Position dialog box launcherIn the Format Picture dialog box, resize or crop the picture as needed so that the height is set to 2” and the width is set to 2”. Repeat steps 2-4 for the other duplicate pictures. To reproduce the other animation effects on this slide, do the following: On the Animations tab, in the Advanced Animation group, click Animation Pane. In the Animation Pane, select the third animation effect (fade effect for the second picture). On the Animations tab, in the Timing group, in the Delay box, enter 2.5. In the Animation Pane, select the fifth animation effect (fade effect for the third picture). On the Animations tab, in the Timing group, in the Delay box, enter 5. In the Animation Pane, select the seventh animation effect (fade effect for the fourth picture). On the Animations tab, in the Timing group, in the Delay box, enter 7.5. On the slide, press and hold SHIFT and select all four pictures. On the Home tab, in the Drawing group, click Arrange, point to Align, and then do the following: Click Align Selected Objects. Click Align Center. Click Align Middle. Drag the pictures into the top left corner of the slide. To reproduce the background effects on this slide, do the following: On the Home tab, in the Drawing group, click Shapes, and then under Rectangles click Rectangle (first option from the left). On the slide, drag to draw a rectangle. Select the rectangle. Under Drawing Tools, on the Format tab, in the Size group, do the following: In the Shape Height box, enter 3.42”. In the Shape Width box, enter 10”. Under Drawing Tools, on the Format tab, in the Shape Styles group, click the Format Shape dialog box launcher. In the Format Shape dialog box, click Line Color in the left pane, in the Line Color pane, select No line. Also in the Format Shape dialog box, click Fill in the left pane, in the Fill pane, select Gradient fill, and then do the following: In the Type list, select Linear. Click the button next to Direction, and then click Linear Down (first row, second option from the left). Under Gradient stops, click Add gradient stops or Remove gradient stops until two stops appear in the drop-down list. Also under Gradient stops, customize the gradient stops that you added as follows: Select the first stop in the slider, and then do the following: In the Position box, enter 1%. Click the button next to Color, click More Colors, and then in the Colors dialog box, on the Custom tab, enter values for Red: 94, Green: 156, Blue: 198. In the Transparency box, enter 60%. Select the last stop in the slider, and then do the following: In the Position box, enter 100%. In the Transparency box, enter 90%. On the slide, drag the rectangle vertically to position it just above the middle of the slide. On the Home tab, in the Drawing group, click Arrange, and then do the following: Point to Align, and then click Align to Slide. Point to Align, and then click Align Center. Click Send to Back. Right-click the slide background area, and then click Format Background. In the Format Background dialog box, click Fill in the left pane, in the Fill pane, select Gradient fill, and then do the following: Click the button next to Direction, and then click Linear Down (first row, second option from the left) In the Angle box, enter 90⁰. In the Position box, enter 70%. Click the button next to Color, and then click White, Background 1, Darker 5% (second row, first option from the left). Click the button next to Color, and then click White, Background 1, Darker 25% (fourth row, first option from the left). D’autres informations sur ce qui se fait ailleurs la prochaine fois…
 To reproduce the first picture effect on this slide, do the following: On the Home tab, in the Slides group, click Layout and then click Blank. On the Insert tab, in the Images group, click Picture. In the Insert Picture dialog box, select a picture, and then click Insert. Under Picture Tools, on the Format tab, in the bottom right corner of the Size group, click the Size and Position dialog box launcher. In the Format Picture dialog box, resize or crop the picture as needed so that the height is set to 2 and the width is set to 2 . To crop the picture, click Crop in the left pane, and in the Crop pane, under Crop position, enter values into the Height, Width, Left, and Top boxes. To resize the picture, click Size in the left pane, and in the Size pane, under Size and rotate, enter values into the Height and Width boxes. Also in the Format Picture dialog box, click Line Color in the left pane. In the Line Color pane, select Solid line, click the button next to Color, and then under Theme Colors click White, Background 1 (first row, first option from the left). Also in the Format Picture dialog box, click Line Style in the left pane, and then in the Line Style pane, in the Width box, enter 1.5 pt. Also in the Format Picture dialog box, click Shadow in the left pane. In the Shadow pane, click the button next to Presets, and then under Outer click Offset Center (second row, second option from the left). On the slide, select the picture. On the Animations tab, in the Advanced Animation group, click Add Animation, and then under Entrance click Fade. Also on the Animations tab, in the Timing group, do the following: In the Start list, select With Previous. In the Duration list, select 1.00 seconds. Also on the Animations tab, in the Advanced Animation group, click Add Animation, and then under Motion Paths click Lines. Also on the Animations tab, in the Animation group, click Effect Options, and then click Right. In the Start list, select With Previous. In the Duration box, enter seconds. On the slide, select the motion path. Press and hold SHIFT to constrain the path to a straight, horizontal line, and then drag the right adjustment handle to the right, stopping approximately 1.5 left of the right edge of the slide. (Note: On the View tab, in the Show/Hide group, select Ruler to measure approximately where the endpoint is on the slide.) To reproduce the other pictures on this slide, do the following: Select the picture. On the Home tab, in the Clipboard group, click the arrow to the right of Copy, and then click Duplicate. Repeat this process for a total of four duplicate pictures. Select a duplicate picture. Under Picture Tools, on the Format tab, in the Adjust group, click Change Picture. In the Insert Picture dialog box, select a new picture, and then click Insert. Under Picture Tools, on the Format tab, in the bottom right corner of the Size group, click the Size and Position dialog box launcherIn the Format Picture dialog box, resize or crop the picture as needed so that the height is set to 2 and the width is set to 2 . Repeat steps 2-4 for the other duplicate pictures. To reproduce the other animation effects on this slide, do the following: On the Animations tab, in the Advanced Animation group, click Animation Pane. In the Animation Pane, select the third animation effect (fade effect for the second picture). On the Animations tab, in the Timing group, in the Delay box, enter 2.5. In the Animation Pane, select the fifth animation effect (fade effect for the third picture). On the Animations tab, in the Timing group, in the Delay box, enter 5. In the Animation Pane, select the seventh animation effect (fade effect for the fourth picture). On the Animations tab, in the Timing group, in the Delay box, enter 7.5. On the slide, press and hold SHIFT and select all four pictures. On the Home tab, in the Drawing group, click Arrange, point to Align, and then do the following: Click Align Selected Objects. Click Align Center. Click Align Middle. Drag the pictures into the top left corner of the slide. To reproduce the background effects on this slide, do the following: On the Home tab, in the Drawing group, click Shapes, and then under Rectangles click Rectangle (first option from the left). On the slide, drag to draw a rectangle. Select the rectangle. Under Drawing Tools, on the Format tab, in the Size group, do the following: In the Shape Height box, enter In the Shape Width box, enter 10 . Under Drawing Tools, on the Format tab, in the Shape Styles group, click the Format Shape dialog box launcher. In the Format Shape dialog box, click Line Color in the left pane, in the Line Color pane, select No line. Also in the Format Shape dialog box, click Fill in the left pane, in the Fill pane, select Gradient fill, and then do the following: In the Type list, select Linear. Click the button next to Direction, and then click Linear Down (first row, second option from the left). Under Gradient stops, click Add gradient stops or Remove gradient stops until two stops appear in the drop-down list. Also under Gradient stops, customize the gradient stops that you added as follows: Select the first stop in the slider, and then do the following: In the Position box, enter 1%. Click the button next to Color, click More Colors, and then in the Colors dialog box, on the Custom tab, enter values for Red: 94, Green: 156, Blue: 198. In the Transparency box, enter 60%. Select the last stop in the slider, and then do the following: In the Position box, enter 100%. In the Transparency box, enter 90%. On the slide, drag the rectangle vertically to position it just above the middle of the slide. On the Home tab, in the Drawing group, click Arrange, and then do the following: Point to Align, and then click Align to Slide. Point to Align, and then click Align Center. Click Send to Back. Right-click the slide background area, and then click Format Background. In the Format Background dialog box, click Fill in the left pane, in the Fill pane, select Gradient fill, and then do the following: Click the button next to Direction, and then click Linear Down (first row, second option from the left) In the Angle box, enter 90⁰. In the Position box, enter 70%. Click the button next to Color, and then click White, Background 1, Darker 5% (second row, first option from the left). Click the button next to Color, and then click White, Background 1, Darker 25% (fourth row, first option from the left). D’autres informations sur ce qui se fait ailleurs la prochaine fois…")
19
L’association Loisirs et solidarité des retraités du pays bigouden communique:
Organisation d’un voyage vers les châteaux de la Loire, du 11 au 15 avril 2011: Villandry, Chambord, Blois, Amboise, Chenonceaux, Ussé. Il reste des places disponibles. Prix 575 € (425 € pour les personnes non imposables) Contacter M. Postic, adhérent UTL Tel:
 Contacter M. Postic, adhérent UTL Tel:")
20
La citation du jour Tandis qu'à leurs œuvres perverses
Les hommes courent haletants, Mars qui rit malgré les averses, Prépare en secret le printemps. Théophile Gauthier

21
N’oubliez pas de consulter et de contribuer à votre site internet
www. utlpaysbigouden.fr/

Présentations similaires